Interior
Blend Silver & Gold in Decor with Ease
Discover how to mix silver and gold interior design to create a luxurious space that radiates modern elegance and timeless sophistication.
Combining silver and gold in your home decor is not just a fleeting trend; it’s a stylish way to bring elegance and sophistication into your space. As the popularity of metallic home decor continues to rise, especially since 2016, understanding how to mix silver and gold interior design effectively is key to achieving a cohesive and luxurious ambiance. Pinterest showcases countless ideas that inspire you to explore this dynamic duo.
To create an inviting atmosphere, it’s essential to balance warm and cool tones, ensuring that the metals complement each other while maintaining visual harmony. By limiting your choice of metal finishes to a maximum of three, you can avoid a chaotic look and instead cultivate a refined aesthetic. Remember, blending textures—matte, polished, and hammered—can elevate your decor and add depth to your design. So, whether you’re looking to add a dash of shimmer to a cozy nook or transform your entire living space, mastering the art of mixing silver and gold will help you achieve that desired luxurious flair.
Key Takeaways
- Mixing metals in decor is an increasingly popular trend that adds sophistication.
- Maintain a balance between warm and cool tones for harmonious decor.
- Limit the number of metal finishes to three for a cohesive look.
- Use variations in texture, such as matte, polished, and hammered, to enhance visual appeal.
- Aim for a 70/30 ratio of dominant to secondary metal tones when mixing.
- In smaller spaces, stick to two metal tones to avoid overcrowding.
- Incorporate accent colors like blue for added depth and style in metal decor.
The Elegance of Mixing Silver and Gold in Decor
Blending silver and gold in home decor creates an inviting atmosphere that strikes a balance between chic and sophisticated. This visual appeal arises from the unique juxtaposition of warm gold tones against cooler silver shades. The allure of mixing these two metallic finishes has made it a hot trend across various interior design platforms, especially on Pinterest, where you can find a wealth of ideas and inspiration.
When considering how to mix silver and gold interior design, remember that simplicity can often make the strongest impact. For smaller spaces like bathrooms, it’s advisable to limit choices to two metal finishes. In larger areas, such as living rooms, you can creatively incorporate up to three different finishes. The key lies in choosing one dominant metal and adhering to guidelines like the 70/30 rule, which helps maintain harmony in your decor.
This trend extends beyond traditional home decor, influencing other industries such as wedding styles and glam decor, showcasing its versatility. Using both silver and gold elevates spaces and offers a unique appearance, enabling you to add a touch of elegance to your interiors. Achieving this bold yet sophisticated style choice not only brings personality to your home but also invites guests to admire the design finesse.
Understanding Metallic Finishes in Interiors
When embarking on modern interior design with silver and gold, understanding different metallic finishes in interiors becomes crucial. The variety of finishes, such as matte, glossy, brushed, and polished, provides a canvas for creating diverse atmospheres in your home. Each finish imparts a unique quality, allowing you to express your personal style.
For instance, a polished gold piece radiates opulence, enhancing the elegance of a space. In contrast, a brushed silver finish evokes a contemporary vibe, promoting a more casual yet sophisticated aesthetic. Popular metal finishes like stainless steel, brushed nickel, and polished chrome add versatility and can coordinate beautifully with gold or silver accents.
Mixing metals has gained popularity, deviating from the traditional single-tone approach. This trend not only adds visual interest but also infuses personality and depth into your interior design. Using elements like aged bronze beside brass or incorporating gunmetal accents with polished chrome creates a layered look that feels both cohesive and dynamic.
To effectively mix metallic finishes in interiors, start by selecting a dominant finish, then choose one or two accent metals. Think about the undertones; warm metals like brass and copper can blend seamlessly with cooler shades like silver and nickel. Lighting conditions play a significant role in how these finishes appear, enhancing their reflective qualities and overall appeal.
Choosing the right balance and placement is essential to achieve a harmonious blend. Aim for a limited selection of two or three finishes to avoid creating a chaotic environment. Practical application might include using chrome for bath faucets paired with gold tones in other elements, providing elegance and warmth to the bathroom. Repeating the same finish in multiple areas establishes a pleasing rhythm throughout the space.
How to Mix Silver and Gold Interior Design
Mixing silver and gold in your decor can create a luxurious and sophisticated ambiance. It is essential to maintain the right balance for a harmonious look. Start by incorporating silver and gold accents wisely, ensuring that neither metal overwhelms the other. This balance can be achieved through thoughtful selections of complementary pieces. For instance, pairing gold curtains with a sleek silver chandelier elevates the elegance of your space. Consider using aipowered interior design tools to help you visualize how different silver and gold elements will work together in your space. These tools can also provide suggestions for specific pieces that will complement each other seamlessly. Additionally, don’t be afraid to experiment with different textures and finishes to add depth and visual interest to your decor.
Choosing the Right Balance
When figuring out how to mix silver and gold interior design, consider the scale of your area. In smaller spaces, limit your use to two different metal finishes. Larger spaces, on the other hand, can accommodate up to three metals. Applying the 70/30 rule suggests that one metal should dominate about 70% of the aesthetic, while the remaining 30% can feature other accents. Alternatively, the 60/30/10 rule adds further versatility, allowing for an additional metal or color.
Utilizing Texture and Finish for Depth
Incorporating varied textures and finishes adds depth to your decor. Use a mix of matte and glossy metallics to create visual interest, enhancing the overall aesthetic of your space. Consider mixing items like decorative accessories that shine with soft fabrics that have a subtle sheen. In addition, color temperature influences how the metals interact. Warm metals like gold should complement cool ones like silver for a cohesive look. This interaction is especially relevant when using metal picture frames which come in a variety of finishes, such as Silver, Gold, and Bronze.
Metal Finish | Recommended Pairings | Ideal Usage |
---|---|---|
Gold | Silver, Brass | Warm spaces with red/brown hues |
Silver | Gold, Chrome | Cool spaces with blue/green hues |
Brass | Gold, Copper | Neutrals and earth tones |
Incorporating Silver and Gold Accents
Adding metallic elements to your home can elevate your decor, particularly when incorporating silver and gold accents. Choosing the right accent pieces not only showcases these metals, but it also creates a polished and sophisticated atmosphere. By selecting smaller items such as candlesticks, vases, and art frames that exhibit both silver and gold, you ensure that these accents enhance rather than overwhelm your space.
Accent Pieces that Shine
Focus on accent pieces that embody the elegance of both metals. A well-placed decor item can significantly enhance your home’s overall aesthetic. Consider the following options:
- Candlesticks featuring both gold and silver finishes
- Mixed metallic vases that serve as stunning focal points
- Picture frames that harmoniously blend silver and gold tones
Each of these accent pieces can create striking visual interest while maintaining a cohesive look throughout your home. Distributing these items evenly across different surfaces promotes balance and encourages a flow within your decor scheme.
Combining Accessories for Visual Cohesion
To achieve visual cohesion in home decor, focus on pairing accessories that either share similar styles or complement contrasting elements. For instance, pairing modern geometric gold lamps with sleek silver vases can lead to a curated and intentional appearance. Keeping the following tips in mind can enhance your decor:
- Utilize pieces with different textures and finishes to add depth.
- Mix metals such as polished brass with satin nickel for dynamic contrast.
- Ensure that each type of metal appears in multiple locations to establish a cohesive aesthetic.
By carefully considering your accent pieces and their arrangement, you can craft an environment that radiates sophistication and warmth while effectively incorporating silver and gold accents throughout your home.
Accent Piece | Material Combination | Stylistic Effect |
---|---|---|
Candlesticks | Gold and Silver | Elegant, warm glow |
Vases | Mixed Metallics | Cohesive, eye-catching |
Picture Frames | Brass and Nickel | Timeless, sophisticated |
Creating a Silver and Gold Color Scheme
Designing a captivating silver and gold color scheme requires a thoughtful approach. Begin by considering the interplay between lighter and darker shades. Using a combination of silver and gold can highlight the unique qualities of each metallic finish. For instance, while polished nickel provides a sleek look, oil-rubbed bronze can create a more rustic feel, giving the space character.
When incorporating metals, it’s beneficial to avoid a matchy-matchy approach. A recommended practice involves mixing two or three different metals, such as chrome and gold accents, to foster a diverse yet cohesive visual experience. This method adds depth to your decor while ensuring that your silver and gold color scheme remains engaging.
Adding non-metal materials can also break the monotony created by the metallic elements. Consider incorporating fabrics or wallpapers that feature metallic accents. This detail subtly ties together the hardware finishes, enriching the overall aesthetic. Textures play a significant role in harmonizing the various elements; combining delicate and bold textures enhances the silver and gold color scheme.
It’s essential to think of metal finishes as colors to effectively harmonize them throughout your home. For instance, matching metallic tones with your existing color palette ensures that the silver and gold accents complement the space instead of overwhelming it. Spacing out these metallic fixtures prevents a cluttered appearance, allowing each element to shine.
Metal Finish | Best Application | Texture Options |
---|---|---|
Polished Silver (Chrome) | Kitchens, Modern Decor | Smooth, High-Gloss |
Brushed Nickel | Classic, Timeless Spaces | Satin, Textured Finish |
Gold Accents | Statement Pieces, Glamorous Touches | Bright, Reflective |
Oil-Rubbed Bronze | Rustic, Vintage Style | Matte,Muted |
Adapting your metallic choices to the overall color scheme can create a harmonious environment. Consider warm and cool tones for a visually appealing contrast in your space. By carefully planning your silver and gold color scheme, you can achieve a sophisticated and inviting atmosphere that captures the essence of modern interior design.
Luxury Interior Design Trends Featuring Metallics
In the world of luxury interior design trends, the integration of metallics such as silver and gold has become a defining feature. These materials add a sense of richness and sophistication that instantly elevates any space. Designers are now embracing the concept of blending silver and gold in home decor to create visually captivating environments that attract the eye and stimulate the senses.
Current Trends in Luxury Decor
Today, metallics like gold, silver, and even copper are trending prominently in high-end decor. The use of these finishes not only creates a shimmering effect but also enhances the overall brightness and spaciousness of a room. Mixing metals provides a unique texture and visual interest that contributes to the chic aesthetic of modern interior design with silver and gold. For instance, vintage chandeliers and striking metallic wallpapers have gained popularity for their ability to instill a sense of opulence.
Influence of Silver and Gold in Contemporary Design
Silver and gold, once typically reserved for accessories, have expanded their reach into furniture and lighting designs. Elements such as gold leaf embellishments and bold statement pieces, including gold tubs and elaborate chandeliers, are now essential components of modern luxury homes. These metals harmonize beautifully with glass elements, creating a fresh, open ambiance that makes interiors feel more inviting. Experimenting with these metallics allows for an engaging blend of elegance and eclecticism, achieving a balanced look that showcases personal style.
Metallic Element | Application | Design Impact |
---|---|---|
Gold | Lighting fixtures | Creates warmth and richness |
Silver | Furniture accents | Adds a sleek, modern touch |
Copper | Farmhouse sinks | Brings rustic charm to kitchens |
Brass | Drapery rods | Offers a vintage appearance |
Mixed Metallics | Vignettes | Enhances visual interest and balance |
Silver and Gold Furniture Pairing Tips
Pairing silver and gold furniture creates an inviting and sophisticated atmosphere in your living spaces. Start by establishing a focal point to guide your selection. This can be a striking piece, such as a gold accent chair alongside silver side tables, which sets the tone. Achieving a harmonious balance with silver and gold furniture pairing ensures that neither metal overpowers the other.
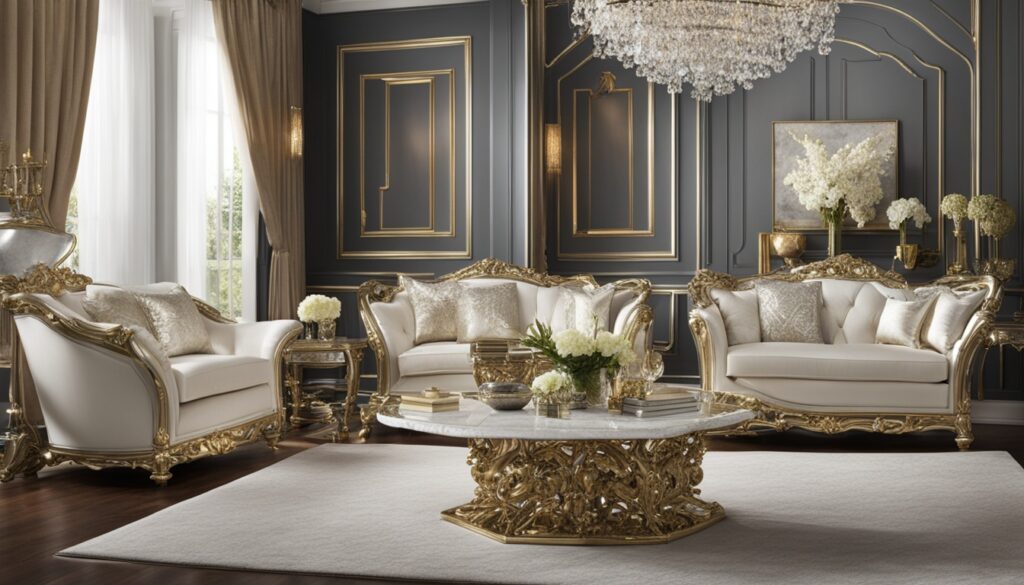
Pay attention to the size and scale of your pieces. Large statement furniture can work beautifully when complemented with smaller accent pieces, giving a layered effect. Consider incorporating textured metals like hammered or antiqued finishes, as these can introduce visual interest and depth. Embracing different finishes allows for a more dynamic look while elevating the elegance of your decor.
It’s wise to distribute your silver and gold furniture around the room rather than isolating certain pieces. This strategy promotes a cohesive look without creating visual clutter. For the best results, choose one main metal, like a dominant silver centerpiece, and let your gold pieces serve as supporting elements that enhance your overall design.
- Mix two or three metals for a balanced aesthetic.
- Spread various finishes around the room for harmony.
- Consider design flexibility; there are no strict rules.
- Incorporate textures for added intrigue.
Experimenting with silver and gold furniture pairing can significantly beautify any room. Explore different combinations and find what resonates with your personal style while ensuring a sophisticated and polished finish to your decor.
Conclusion
In summary, blending silver and gold in home decor can elevate your living spaces to new heights of sophistication. These metals each bring their own character—gold adds warmth while silver lends a cooler touch. By thoughtfully choosing a dominant metal, you can create a solid foundation for your decor while allowing for the playful introduction of other metals, such as copper and brass, to add texture and depth.
As you’ve seen throughout this article, the appeal of mixing metals isn’t just a trend; it’s a celebration of individuality and creativity in interior design. Whether you’re selecting unique furniture pieces or integrating metallic accents through textiles and accessories, the versatility of silver and gold can beautifully enhance any style—from modern to vintage. Don’t hesitate to experiment; after all, the journey of crafting your personal design statement should be just as enjoyable as the final result.
With 2024 marking a bold shift towards mixed metal decor, now is the perfect time to embrace blending silver and gold in your home. These elements provide not only aesthetic appeal but also durability and timelessness, ensuring your decor remains both fashionable and functional for years to come.
FAQ
How can I effectively mix silver and gold in my home decor?
What types of metallic finishes should I consider?
Can you suggest some accent pieces that combine silver and gold?
How can I create a harmonious color scheme with silver and gold?
What are the latest trends in mixing metallics for luxury decor?
How should I pair furniture pieces with silver and gold finishes?
What should I keep in mind about visual cohesion when mixing metals?
Interior
How to Name Your Interior Design Business
Optimize your brand identity with the perfect name for your interior design business, but what key elements should you consider first? Discover them here!
Naming your interior design business is crucial for establishing a memorable brand. Start by brainstorming names that include relevant design keywords, guaranteeing they're short and easy to pronounce. Incorporate elements of your personal style to make it unique, but avoid overly clever names that confuse your services. Check for existing trademarks to dodge legal issues. Secure a matching domain name for online presence, and consider feedback from your target audience to gauge appeal. Remember, a strong name not only attracts clients but builds your reputation too. Discover more tips to guarantee your name stands out and works for you.
Key Takeaways
- Brainstorm names that include relevant design keywords to clearly convey your services and attract the right clientele.
- Choose a short, memorable name that is easy to pronounce, enhancing word-of-mouth marketing.
- Research existing names and trademarks to ensure uniqueness and avoid legal issues in the future.
- Check domain name availability early to secure your online identity and improve search engine discoverability.
- Gather feedback from your target audience to assess the appeal and relevance of your potential business names.
Importance of a Business Name
When launching your interior design business, the name you choose plays a crucial role in shaping your brand identity. A well-chosen business name can greatly impact client perceptions and build trust in the services offered. You want your name to be memorable, enhancing word-of-mouth marketing and making it easy for satisfied clients to refer others to your business.
Additionally, having a clear and distinctive name can help you stand out in competitive markets, much like how diversification of retirement portfolios reduces risk exposure in finance. Clarity in your business name helps attract the right clientele by accurately reflecting the core services you provide. This prevents any misinterpretation of your focus, allowing potential clients to understand what you offer right away.
Additionally, a strong name contributes to your reputation in the industry, setting you apart from the competition. Effective naming strategies aren't just about creativity; they also improve your search engine optimization (SEO). A name that resonates with your target audience increases your online visibility, making it easier for potential clients to find you.
Strategies for Effective Naming
Choosing the right name for your interior design business is vital to establishing a strong brand presence. Start by brainstorming business name ideas that incorporate relevant design keywords. This not only enhances clarity but also attracts your target audience. Aim for names that are short, easy to remember, and pronounceable; this increases the likelihood of word-of-mouth referrals.
Consider using your personal brand as part of your interior design company names. Combining your name with descriptive terms can create an authentic identity that reflects your unique design philosophy. Remember to check domain availability to guarantee a cohesive online presence.
Conduct thorough research on existing business names and trademarks. This step is essential to avoid legal conflicts and to confirm that your name is unique in the market. Set a time limit for naming your business to encourage decisive selection.
Don't get stuck in indecision; instead, choose a name that aligns with your long-term business goals. By following these strategies, you'll be well on your way to creating a memorable brand that resonates with your audience.
Common Naming Mistakes
A common pitfall in naming your interior design business is opting for a name that's hard to pronounce or spell. This can lead to confusion among potential clients, diminishing brand recall and making referrals harder.
Another mistake is crowdsourcing opinions on your name; conflicting feedback can stall your decision-making, dragging out the naming process.
Using geographic names can limit business expansion opportunities, as they may create the perception that you only serve a localized area. It's essential to conduct thorough research on existing names to avoid legal issues and brand confusion, especially if a similar name is already in use.
Additionally, choosing overly clever or obscure names can obscure your core services, making it difficult for clients to grasp what you offer.
Remember, your name should communicate your identity clearly and resonate with your target audience. Avoid these common naming mistakes to guarantee your business stands out and remains memorable.
Domain Name Considerations
Securing the right domain name is essential for establishing your interior design business's online identity. You need to check domain name availability early in the naming process to guarantee a strong online presence.
When choosing your interior design business name, consider combining it with relevant keywords or descriptive terms from the design industry. This enhances both searchability and clarity.
If your preferred domain name isn't available, explore different domain extensions like .design or .studio. However, be cautious of potential user confusion that could arise from less common extensions. An easy-to-pronounce and memorable domain name reflects your brand and makes it easier for clients to find you online.
Utilize WHOIS to check domain ownership details, which can also help you reach out to current owners if you're interested in acquiring a taken domain.
Regularly monitor the status of your chosen domain name and keep track of expiration dates. This vigilance prevents losing ownership or creating confusion with competitors.
Tips for Successful Naming
When diving into the process of naming your interior design business, it's crucial to keep a few key strategies in mind to guarantee your name resonates with clients and stands out in a crowded market.
First, incorporate design-related keywords in your name to enhance clarity and improve searchability for potential clients. This helps convey your focus on interior design services right away.
Next, aim for simplicity. Choose a name that's easy to pronounce and spell; memorable names are more likely to be referred by satisfied clients.
Conduct thorough research to confirm your chosen name is unique, avoiding any legal issues or confusion with other businesses.
Consider blending personal names with descriptive terms to add a personal touch, effectively showcasing your design style while fostering a connection with clients.
Additionally, gather feedback from your target audience and peers on your shortlisted options. Their insights can be invaluable in gauging appeal and relevance, ultimately helping you choose a catchy interior design company name that reflects your vision and attracts clients.
Conclusion
Choosing the right name for your interior design business can set you apart and attract clients. Remember, a great name should evoke creativity, reflect your style, and resonate with your audience. Avoid common pitfalls, secure a fitting domain, and embrace the power of clarity and uniqueness. So, think boldly, act confidently, and name wisely. Your business deserves a name that inspires trust, sparks curiosity, and showcases your vision. Now, go out there and make your mark!
Interior
How to Determine My Interior Design Style
Ponder your personal style with our quick quiz and discover the design that speaks to you—unlock the secrets to creating your dream space.
To determine your interior design style, start by taking an interactive quiz that reveals your unique preferences in under two minutes. Reflect on your personal experiences, favorite colors, and even your wardrobe choices, as these can provide insight into your desired aesthetic. Explore various design archetypes like Bohemian, Modern, or Farmhouse to see which resonates most with you. Create a Pinterest board for visual inspiration and gather ideas based on recurring colors and textures. By following these steps, you'll gain clarity and direction for your home. Stick around, and you'll discover even more tips to refine your newfound style.
Key Takeaways
- Take an interactive interior design quiz to discover your unique decorating style in under two minutes.
- Reflect on your experiences and cultural influences to identify your personal tastes in color and mood.
- Analyze your clothing style and favorite colors to uncover patterns that guide your design choices.
- Create a visual inspiration board on Pinterest to gather ideas and identify recurring themes in your preferences.
- Use quiz results and mood boards to explore furniture and accessories that align with your identified style archetypes.
Take the Interior Design Quiz
To discover your unique decorating style, take the Interior Design Quiz—a free, interactive tool that reveals your personal aesthetic in under two minutes. This quiz is designed to help you find your design by asking questions about your lifestyle, material preferences, and favorite furnishings.
As you answer, you'll explore various home decor styles, including Bohemian, Glam, and Midcentury Modern. The results provide detailed insights into your unique decorating style, helping you understand how to incorporate these influences into your living space.
Once you complete the quiz, you'll gain access to personalized resources and tips that guide you in creating a tailored environment that reflects your individual taste. This not only empowers you to make informed choices, but also guarantees your home feels cohesive and inviting.
Additionally, engaging with the interior design quiz opens opportunities to connect with professional designers. If you're looking for further guidance, these experts can help you refine your vision and achieve a stunning home decor style.
Understanding Your Personal Style
After discovering your design preferences through the quiz, it's time to unpack what truly resonates with you on a personal level. Your unique style is shaped by your experiences, culture, and family background, influencing how you feel in your home. To create a meaningful atmosphere, you need to identify your decorating style.
Here's a simple table to help you reflect on your preferences:
Aspect | Reflection Questions | Insights |
---|---|---|
Color Choices | What colors make you feel happy? | Discover your unique color palette |
Clothing Style | What do you love to wear? | Identify patterns in your style |
Home Mood | How do you want your home to feel? | Create a vibe that resonates with you |
Exploring Design Style Archetypes
Exploring design style archetypes can be an exciting journey that helps you pinpoint the aesthetic that best suits your lifestyle. By categorizing your personal preferences, you can simplify the decorating process and enhance your home environment.
Consider popular style archetypes like Traditional, Bohemian, Modern, and Farmhouse. Each one offers distinct characteristics that can guide you in making informed design choices. For instance, the Modern Farmhouse Decor Trends highlight the use of earthy tones and natural materials, which can inspire your interior choices.
You might find that you embody a blend of multiple styles, creating a unique combination that reflects your personality. For instance, you could mix Traditional's clean lines and luxurious fabrics with Bohemian's eclectic patterns and vintage elements. This fusion fosters creativity, allowing you to craft a cohesive home aesthetic that feels genuinely yours.
To kickstart your exploration, take an interior design style quiz. This tool can reveal your preferred styles and archetypes, making it easier to select decor that resonates with you.
Visual Inspiration and Brainstorming
In the world of interior design, visual inspiration and brainstorming serve as essential tools for defining your unique aesthetic. One effective way to gather visual inspiration is by creating a Pinterest board. Pin items you love to help identify your personal style without getting caught up in specific design genres.
Next, take a look around your home. Reviewing existing items can reveal your decorating preferences and highlight pieces you dislike, which may lead to decluttering.
Additionally, analyze your clothing choices; they can provide valuable insights into your favorite colors and styles, influencing your home's color palette and décor choices.
As you compile your inspirations, pay attention to recurring colors, textures, and shapes. This will help you create a cohesive style that reflects who you are.
Remember to incorporate neutral colors to maintain balance and versatility in your design.
Next Steps for Your Home
Now that you've gathered inspiration and identified your style, it's time to take concrete steps to bring your vision to life. Start by using your interior design style quiz results to understand your unique preferences.
Creating a mood board that captures your ideal aesthetic will help you visualize the colors, textures, and furniture pieces that resonate with you. For instance, if you gravitate towards a Mid-Century Modern design, consider incorporating iconic furniture pieces that offer timeless appeal.
Next, explore furniture and accessory options that align with your identified style archetypes. Don't hesitate to blend elements from different styles; this personalization can enhance your cohesive style.
To guarantee your space reflects your vision, declutter items that don't fit your aesthetic. This will create a clean canvas for your design journey.
Finally, share your quiz results and mood board with friends or a design professional. Their feedback can boost your confidence and help refine your decisions.
Here are some next steps to evoke excitement:
- Imagine your perfect space.
- Feel the textures you'll incorporate.
- Envision the colors that spark joy.
- Dream about the gatherings in your beautifully styled home.
- Anticipate the compliments on your unique design.
Conclusion
Now that you've explored your interior design style, think of it like planting a garden. Just as each flower needs the right conditions to bloom, your home thrives when it reflects your unique tastes. Remember the excitement of finding that perfect plant that completes your garden? That's the joy of discovering your style! By surrounding yourself with pieces that resonate with you, your space will flourish into a sanctuary that feels like home. Let your creativity grow!
Interior
How to Do 3d Rendering for Interior Design
Get ready to transform your interior design vision into stunning 3D renderings—discover the essential steps to achieve breathtaking results.
To do 3D rendering for interior design, start by gathering detailed floor plans and inspiration to guide your vision. Choose suitable software like SketchUp or Revit to create your 3D model, ensuring you apply high-quality textures and materials that reflect real-life aesthetics. Set up effective lighting to highlight design features, and experiment with camera angles for the best viewpoints. Post-process your images using tools like Photoshop to enhance details and adjust colors. Deciding whether to render it yourself or hire a professional can impact quality and time. Continue to explore techniques and tools for more refined results.
Key Takeaways
- Gather detailed floor plans, measurements, and materials to ensure accuracy in your 3D design representation.
- Select suitable 3D modeling software and master essential techniques for effective model creation.
- Apply high-quality textures and materials using UV mapping for realistic surface representation.
- Set up a balanced lighting scheme to enhance depth and highlight key design elements.
- Utilize post-processing tools to refine rendered images and align them with your design vision.
Importance of 3D Rendering
3D rendering is a game-changer in interior design, transforming abstract ideas into vivid, photorealistic visuals.
You'll find that incorporating 3D rendering into your projects greatly enhances visual communication with your clients. Realistic images allow them to grasp your design intent, leading to informed decisions. This clarity accelerates the design approval process, as you can showcase multiple interior design ideas and material options without confusion.
The rendering process identifies potential design issues early on, helping you avoid costly mistakes before construction begins. Not only does this save time and money, but it also streamlines your workflow.
Plus, advanced rendering techniques create immersive experiences, like 360-degree panoramas and virtual walkthroughs, which boost client engagement and satisfaction.
Gathering Information and Inspiration
Before diving into the rendering process, it's vital to gather thorough information and inspiration that will shape your design vision. Start by collecting detailed floor plans, measurements, and materials to guarantee an accurate representation of the space. This foundational knowledge will guide your design concepts and help you align your work with the client's personal style.
Consider incorporating elements from current trends, like the use of neutral color palettes and natural materials, which can enhance the overall aesthetic.
Next, research current design trends by exploring design magazines, websites, and social media platforms. This will enrich your ideas and inform your creative direction. Don't hesitate to explore various styles and aesthetics to broaden your perspective.
As you gather inspiration, create mood boards that visually compile colors, textures, and furnishings. These boards are invaluable for effectively communicating your concepts and ideas to clients, making sure everyone is on the same page.
If you're working on high-end projects, focus on elegance and sophistication by selecting materials and finishes that reflect luxury aesthetics. This careful consideration of design elements won't only elevate your renderings but also resonate with your client's vision.
Creating a 3D Model
When you start creating a 3D model, selecting the right software is key to bringing your vision to life.
Tools like SketchUp, AutoCAD, or Revit can help you translate your 2D floor plans into detailed three-dimensional spaces.
Make sure you master essential modeling techniques to accurately incorporate elements that reflect your design aesthetic.
Software Selection Process
Choosing the right software for creating a 3D model in interior design can greatly impact your workflow and the quality of your final product. During the software selection process, consider popular options like SketchUp for its user-friendliness or 3ds Max for advanced features and enhanced photorealism.
Both programs offer essential modeling tools, such as extrusion, scaling, and rotating, which are vital for building detailed interior spaces. Make certain the software you choose has a robust library of pre-made 3D models and textures. This will streamline your modeling process and improve design accuracy.
Additionally, check the hardware requirements to guarantee your computer has a sufficient graphics card and enough RAM for peak performance during 3D rendering.
Don't forget to explore plugins and additional rendering engines, like V-Ray or Lumion, which can be integrated with your modeling software. These tools can greatly enhance your visualization and final output quality.
Essential Modeling Techniques
After selecting the right software, you can start crafting your 3D model with confidence. Begin by creating a detailed 2D floor plan using 3D modeling software like AutoCAD or SketchUp. Verify accurate measurements and furniture placements to establish a solid foundation for your design process.
Once your floor plan is in place, extrude walls, and add openings for windows and doors to create a realistic spatial layout.
Next, incorporate essential interior design elements such as furniture, lighting fixtures, and decor. Pay attention to scale and proportions to maintain authenticity throughout your model. Organize your work using layers, groups, and components, which will streamline the design process and make adjustments easier as you progress.
As you refine your 3D model, apply materials and textures that align with your design vision. This step is vital for enhancing the overall aesthetic and realism of the space.
Applying Materials and Textures
When you're applying materials and textures in your 3D rendering, choosing the right materials is essential for achieving that desired look.
You'll want to explore various texture application strategies to enhance realism, especially with finishes that reflect light and create depth.
Material Selection Techniques
Applying materials and textures effectively is essential for achieving a realistic look in your 3D interior designs. Start by utilizing the material editor to adjust properties like diffuse color, reflection, and bump mapping. This attention to detail gives you a realistic outcome that captivates viewers.
When selecting materials, prioritize high-quality texture maps that correspond to real-world materials, guaranteeing they fit the overall design aesthetic and client expectations. Experiment with various material types—matte, glossy, and transparent—to add depth and visual interest to the rendered space.
Incorporate advanced techniques like UV mapping to accurately position textures on your 3D models. This helps prevent distortion and enhances realism, making your designs more believable.
Lastly, validate the impact of your selected materials by conducting test renders. This step allows you to see how adjustments affect the final rendering before you present your work.
Texture Application Strategies
How can you guarantee textures enhance your 3D interior designs effectively? By employing smart texture application strategies, you can create a realistic representation that greatly improves the overall visual quality of your project.
Start by selecting materials that align with your room's aesthetic, like luxurious marble or rich mahogany. This choice sets the tone for your design.
- Use the material editor in your 3D software to adjust properties such as diffuse, reflection, and bump mapping.
- Validate the scale and orientation of textures to guarantee consistency across surfaces.
- Experiment with different texture maps, like normal and displacement maps, to achieve depth and realism.
Don't overlook the importance of lighting effects; your textures should react to light naturally, highlighting properties like glossiness or transparency.
By focusing on these elements, you'll guarantee your rendered images not only look appealing but also convey a sense of authenticity.
Mastering these texture application strategies will elevate your interior design projects and impress clients with stunning, lifelike visuals.
Enhancing Realism With Finishes
Textures alone won't fully bring your 3D interior designs to life; finishes play an essential role in enhancing realism. When working on your interior design rendering, consider using high-end finishes like marble and mahogany. These materials not only elevate the perceived luxury of your space but also help create a cohesive design that aligns with your client's vision.
Applying realistic textures, such as bump and displacement maps, adds depth to surfaces, making them lifelike.
Don't overlook the importance of material editing; adjusting properties like reflection, refraction, and glossiness gives you greater control over the visual outcome. This guarantees that each finish complements the overall aesthetic you're aiming for.
To validate your choices, test how selected materials react in various lighting conditions. Observing their interaction with light and shadow will provide insight into how well they enhance the realism of your render.
Setting Up Lighting and Cameras
Lighting and camera setup are essential for bringing your interior design renderings to life. You'll want to position lighting fixtures strategically to highlight key features like artwork or architectural details. A combination of natural and artificial light sources creates a dynamic effect.
To enhance your renderings, consider these key lighting techniques:
- Experiment with ambient, task, and accent lighting to build layers of illumination.
- Utilize a three-point lighting setup, including a key light, fill light, and back light, for a balanced, professional look.
- Adjust lighting to create depth and mood, guiding the viewer's eye to focal points.
Next, focus on camera angles. Set up multiple perspectives to showcase the space's versatility and flow.
Adjust camera settings like focal length and depth of field to develop realistic perspectives. This helps emphasize the design's essential elements while drawing attention to specific areas.
Rendering Your 3D Model
When you're ready to render your 3D model, choosing the right rendering engine is essential for achieving high-quality results.
Make sure you apply texture maps effectively, as they add depth and realism to your design.
Rendering Engine Selection
Choosing the right rendering engine is essential for achieving stunning results in your interior design projects. It greatly influences the quality of your photorealistic rendering and can streamline your workflow.
You'll typically integrate rendering engines like V-Ray or Corona Renderer with popular 3D modeling software such as 3ds Max, SketchUp, or Blender. This combination allows you to utilize advanced material and lighting settings tailored specifically for interior design applications.
Consider these key factors when selecting your rendering engine:
- Quality vs. Speed: Real-time engines like Lumion offer quicker previews, while high-quality engines may require more time for detailed outputs.
- Material and Lighting Options: Many engines come with preset materials and lighting settings, simplifying the process of achieving realistic results.
- Hardware Requirements: Understand the strengths and weaknesses of each rendering engine to balance quality with rendering speed and your available hardware.
Texture Application Techniques
Texture application is a vital step in elevating the realism of your 3D models in interior design. You need to use texture maps that define properties like color, reflection, and bumpiness of surfaces. Start with UV mapping to guarantee your textures fit accurately, avoiding distortion that can ruin the quality of your rendering.
Here's a quick overview of different texture application techniques:
Technique | Description |
---|---|
Procedural Textures | Generated mathematically for complex patterns |
Image-Based Textures | Imported real-world materials like wood or stone |
Material Editor | Fine-tune glossiness, transparency, and bump mapping |
UV Mapping | Adjusts texture alignment to prevent distortion |
Utilizing a material editor within your software is essential for achieving a more lifelike finish. You can adjust properties to make your textures more realistic and visually appealing. Experiment with both procedural and image-based textures to see which works best for your design. By mastering these texture application techniques, you'll create stunning 3D renderings that truly bring your interior designs to life.
Enhancing With Post-Processing
Post-processing is an essential step that can dramatically elevate the quality of your interior design renderings. By using software like Adobe Photoshop or Lightroom, you can refine your images to achieve a more photo-realistic rendering. Import high-resolution JPEG files from visualization programs like 3D Studio Max or Maya to begin fine-tuning your work.
Consider these key techniques during post-processing:
- Lighting adjustments: Enhance the overall ambiance by tweaking brightness and contrast, helping to create an inviting atmosphere.
- Texture refinement: Focus on details that bring your design to life, ensuring surfaces appear realistic and engaging.
- Color correction: Make colors pop and align with your design vision, ensuring the final output resonates with your clients.
Remember to keep all layers visible in your editing software, allowing for flexibility in adjustments. Save your work frequently to avoid data loss during this intensive process.
Evaluating DIY Vs. Professional Rendering
When it comes to 3D rendering for interior design, deciding between DIY and professional services can greatly impact your project's outcome.
DIY 3D rendering might seem appealing, but it requires a substantial investment of 3 to 12 months to develop the necessary skills, along with potential costs of up to $20,000 for software and hardware. For beginners or those on a tight budget, this option can be intimidating.
On the other hand, professional rendering services offer significant time savings and expert-level quality without the need for extensive personal training. Their packages, ranging from $350 to several thousand dollars, can enhance the overall quality of your visual presentations.
By outsourcing 3D rendering, you get access to experienced artists who can provide custom quotes tailored to your specific project needs.
To find the right fit for your interior design projects, take the time to evaluate portfolios of freelance 3D artists. This guarantees style compatibility and allows for a more creative and realistic design outcome.
Whether you choose DIY or professional rendering, make the decision that best aligns with your skills, budget, and project requirements.
Cost Considerations and Pricing
Understanding the costs involved in 3D rendering is essential for making informed decisions that fit your budget. When you're commencing an interior design project, you'll encounter various cost considerations that can impact your choices.
Here are a few key points to keep in mind:
- DIY 3D rendering can set you back up to $20,000, factoring in hardware, software, and training costs.
- Specialized professionals offer rendering packages that range from $350 to thousands, depending on your project's complexity.
- Average project durations can vary from a few days to several weeks, based on design intricacy and detail.
If you're considering outsourcing, many talented 3D artists are available. Reviewing their portfolios can help you find someone who aligns with your specific design needs and budget.
Additionally, utilizing pricing guides and free quote analysis services, like those from Masitects, can assist you in steering through your options effectively.
Benefits of Outsourcing Renderings
Outsourcing 3D renderings lets you focus on the creative aspects of your interior design projects while leaving the technical details to the experts. By collaborating with specialized rendering services, you gain access to professional rendering artists who can elevate the quality and realism of your visualizations. This enhancement leads to more compelling presentations that capture your client's attention.
When you outsource, you can concentrate on core design activities and client interactions, freeing up your time and resources. Custom quotes from rendering services provide flexibility tailored to your project specifics, allowing you to manage your budget effectively. Quick response times and free estimates streamline your decision-making processes, ensuring faster project timelines and improved client satisfaction.
Moreover, working with experienced external artists can spark innovative design solutions, resulting in improved project outcomes. Their fresh perspectives and expertise can transform your initial ideas into stunning visual realities.
Conclusion
In the world of interior design, 3D rendering isn't just a tool; it's your canvas for creativity. By embracing this technology, you can transform your visions into stunning visuals that speak volumes. Whether you choose to tackle it yourself or enlist a professional, the impact of high-quality renderings is undeniable. So, don't let your ideas gather dust—bring them to life and watch your designs soar like a bird set free in the sky.
-
Texts1 month ago
Engaging Illusions: The Art of LED Installation Experience
-
Texts1 month ago
Exploring the Dynamics of Artistic Practice and Public Engagement
-
Texts1 month ago
Exploring Art’s Transformation Through Material and Meaning
-
Art1 month ago
Understanding Why Art Theory is Vital
-
Texts1 month ago
Exploring Financial Landscapes Through Art and Technology
-
Art1 month ago
Exploring Performance Art Theory: A Guide
-
Art1 month ago
Discover Why Art Theory Is Important in Creativity
-
Art1 month ago
Discover Art: Which Is Not an Art Theory?