To take great interior design photos with your iPhone, start by cleaning the lens for clear images. Utilize natural light; shoot during the day and avoid overhead lights to reduce glare. Adjust exposure by tapping on the brightest areas and experiment with angles. Hold the phone steady with both hands or use a tripod for stability. Activate the grid for better composition and crop your images to focus on key elements. Post-capture, enhance your photos with editing apps. By paying attention to these details, you can create eye-catching images that stand out in any portfolio. There's much more to explore! Consider using Canva’s design features to further enhance your interior design photos. Canva offers an array of filters, effects, and customizable tools to add an extra layer of creativity to your images. Experiment with different fonts, overlays, and color adjustments to make your photographs truly standout. With Canva, you can easily elevate your interior design photos to a professional level.
Key Takeaways
- Clean your iPhone lens regularly to ensure sharp and clear images for interior design photography.
- Utilize natural light by shooting during the day, avoiding overhead lights to minimize glare and shadows.
- Adjust exposure settings manually by tapping on the brightest area to maintain detail in your images.
- Use a tripod for stability in low-light conditions and hold the phone with both hands to reduce camera shake.
- Edit photos using apps like Lightroom to enhance brightness, contrast, and achieve a consistent look across your portfolio.

INIU 45W Fast Charging Portable Charger, 40% Smaller 10000mAh with Detachable Cable, Flight-Safe Travel Power Bank, USB C External Phone Battery Pack for iPhone 17 16 Pro iPad Samsung S26 Google etc
40% Smaller & Lighter Portable Charger: Powered by the industry’s first TinyCell high-density battery technology, this ultra-compact 10,000mAh...
As an affiliate, we earn on qualifying purchases.
Importance of Clean Equipment

When it comes to capturing stunning interior design photos, your iPhone's lens plays an essential role in the outcome. Keeping your lens and phone clean is critical for achieving sharp and clear images. Smudges, dirt, and fingerprints can greatly degrade photo quality, resulting in images that lack the clarity you desire.
Additionally, guaranteeing good air quality in your shooting environment can enhance your photos' overall appeal, as air purifiers reduce allergens that might otherwise settle on surfaces and interfere with the light.
To confirm your equipment is in top shape, take just a few seconds to gently wipe the lens and screen with a glass cleaning cloth or a soft cotton t-shirt. This simple cleaning routine can dramatically enhance the quality of your photos, allowing the beauty of your interior designs to shine through.
Before and after cleaning, test your images to see the noticeable improvement in clarity and detail. You'll be amazed at how much of a difference clean equipment makes.
Regular maintenance of your camera gear, including consistent cleaning, is essential for capturing high-quality photos that truly showcase your design work. By prioritizing the cleanliness of your iPhone's lens, you'll set yourself up for success in capturing the stunning interiors you want to highlight.

VRURC Portable Charger Power Bank, Built-in 4 Cables & 2 Ports,10000mAh Slim Battery Pack with LED Display, Travel Essential USB C Portable Phone Charger for All Cell Phones Devices-Pink(1 Pack)
[All-in-One Power Bank 4 Cables Built in] Simplify your gear with built-in Micro, USB-C, and for smart phone...
As an affiliate, we earn on qualifying purchases.
Lighting Techniques for Interior Photography

When you're taking interior photos, natural light is your best friend, so turn off any overhead lights to avoid glare.
Adjust your iPhone's exposure settings to get the right brightness without losing detail in well-lit areas.
Natural Light Utilization
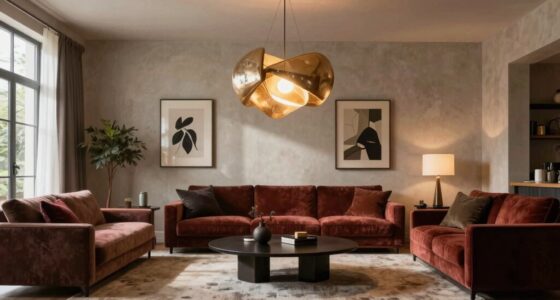
Great interior photos often hinge on the effective use of natural light. To make the most of it, shoot during the day and turn off overhead lights. This helps you avoid unflattering glare and creates a more appealing ambiance.
Overcast days are particularly ideal, as the diffused natural light minimizes harsh shadows and highlights, giving you beautifully soft illumination.
Here are some tips to optimize your natural light utilization for interior photography:
- Adjust exposure settings by tapping on the brightest area of your scene to guarantee proper brightness without losing detail in highlights.
- Experiment with angles and heights to maximize the use of natural light, capturing the space in a way that feels inviting and spacious.
- Avoid mixed lighting situations by exclusively using natural light to prevent unwanted color casts, which can distort the true hues of your interiors.
Overhead Light Avoidance
Natural light plays an essential role in capturing stunning interior photos, but it's equally important to contemplate the impact of overhead lights. These fixtures can create unflattering glare and harsh shadows, distorting the beauty of your space. To achieve the best results, always turn off overhead lights before shooting interiors. Instead, rely on natural light, which offers clearer, grain-free images and enhances the overall appeal of your design.
Shooting during overcast days can be particularly beneficial, as it provides soft, diffused lighting that's ideal for capturing interior designs without the harshness of direct sunlight. If you find that natural light isn't sufficient, consider using supplemental professional flash or strobe lights judiciously.
Be cautious, though—artificial lights can introduce distracting color casts that detract from your photos.
When you're ready to shoot, focus on the brightest part of the room. This will draw attention to key design elements. Remember, adjusting exposure on your iPhone can help you manage brightness levels, ensuring that both bright and shadowed areas retain important details.
Adjusting Exposure Settings
Achieving the perfect exposure in interior photography can greatly enhance the visual appeal of your images. To get the best results with your iPhone camera, focus on adjusting exposure settings carefully. Start by tapping on the brightest area of the scene to set the focus and exposure. This will help preserve highlights without letting them become overexposed.
Here are some tips for mastering exposure:
- Use the exposure slider to manually adjust brightness and detail.
- Experiment with underexposing your shots to retain details in bright areas, especially in rooms with large windows or reflective surfaces.
- Don't hesitate to try different exposure levels while shooting to discover what works best for your scene.
After capturing your images, utilize editing apps to refine exposure settings further. This will enhance the overall quality of your interior design photos, making them pop with natural light and clarity.

VRURC Portable Charger Power Bank, USB C Battery Pack 10000mAh, Flight-Safe Travel Essentials, 5 Outputs 2 Inputs Slim Phone Charging Bank Built-in Cables for Multi Devices-Lavender(1 Pack)
Universally Compatible All Devices: Simplify your tech life,VRURC power bank with built in 4 cables (Micro cable/ type-c...
As an affiliate, we earn on qualifying purchases.
Straightening Verticals for Better Composition

When you're capturing interior design photos, straightening verticals is essential for creating visually appealing compositions. To start, activate the grid feature in your iPhone camera settings. This will help you align vertical lines accurately while composing your shots.
Use the rule of thirds to position key elements along the grid lines, making your photos feel more dynamic. If you're using a tripod, set it up at the correct height to maintain straight verticals and avoid distortion.
Regularly practice taking straight-on shots of spaces to train your eye for vertical alignment, which is vital in interior photography. When you're done shooting, don't forget to utilize editing software to correct any lens distortion that may have occurred during your shoot.
This will enhance the straightness of vertical lines in your photos. Additionally, aim for as much natural light as possible to brighten your images and showcase the space effectively.

INIU Portable Charger, Ultra Mini 10000mAh 45W Fast Charging with Detachable Cable, Flight-Safe Travel USB C Power Bank External Phone Battery Pack for Xiaomi iPhone 17 16 Samsung S26 Google iPad etc
[MINI SIZE. ULTRA PORTABLE CHARGER]: Roughly the size of an AirPods Pro case, this smallest power bank packs...
As an affiliate, we earn on qualifying purchases.
Exposure Control Tips

Effective exposure control is essential for capturing stunning interior design photos with your iPhone. To achieve the perfect brightness and mood, you'll want to manually adjust the exposure slider.
Start by tapping on the area of the scene you want to focus on; this sets both the focus and exposure, ensuring your key elements are well-lit.
Here are a few tips to help you master exposure control:
- Experiment with Levels: Don't hesitate to tap and drag the exposure slider to find the ideal balance for each shot.
- Underexpose Slightly: Slightly underexposing your images can preserve detail in bright highlights, preventing them from becoming washed out.
- Use Editing Apps: Post-shoot, utilize editing apps to refine exposure and enhance the overall quality of your interior design photographs.
Stabilization Techniques for Sharp Images

To capture sharp interior design photos with your iPhone, it's important to stabilize your device. Start by holding your iPhone with both hands. This simple stabilization technique minimizes camera shake, which can lead to blurry photos.
Avoid using the zoom feature; instead, move closer to your subject to maintain clarity. Walking around the space will help you find the best composition and angles, ensuring thoughtful framing before you take the shot.
Consider using a tripod or other stabilizing equipment, especially in low-light situations where motion blur is more likely. A tripod allows for steady shots, giving you the confidence to focus on composition rather than stabilization.
After taking your base photo, review it for any necessary adjustments. Taking multiple shots increases your chances of capturing the best image possible, so don't hesitate to experiment with different angles and settings.
Editing Techniques to Enhance Photos

Although you've captured stunning interior design photos with your iPhone, the magic often happens during the editing process. Using editing tools like the Lightroom app or Afterlight can elevate your images to a professional level. Start by adjusting key elements such as exposure, contrast, and saturation. This will enhance your photos and make them pop.
Here are some essential editing techniques to contemplate:
- Crop for Focus: Eliminate distractions and emphasize your main subject by cropping your photos post-shoot.
- Selective Editing: Use selective editing tools to highlight specific areas, ensuring that details stand out while keeping the overall balance intact.
- Adjust White Balance: Experiment with adjusting the white balance to change the mood of your images, creating warmer or cooler tones as necessary.
For consistency, try using presets or applying the same editing steps across multiple shots. This creates a cohesive look for your interior design portfolio.
Conclusion
By following these tips, you'll transform your iPhone into a powerful tool for capturing stunning interior design photos. Remember, good lighting is like the sun breaking through clouds, illuminating your space with warmth and clarity. Keep your equipment clean, straighten those lines, and control your exposure for sharp, vibrant images. With a steady hand and a bit of editing magic, you'll create photos that not only showcase your designs but also tell a fascinating story.